Adding a Flex Queue
The procedure below describes how to add a new Flex Queue.
|
➢
|
To add a new Call Queue: |
|
1.
|
Open the Queues page (Configuration > Routing > Queues). |

|
2.
|
From the Add New drop-down menu, select Add Flex Queue. |
|
3.
|
In the 'Name' field, enter the name of the queue. |
|
4.
|
In the 'Description' field, enter a short description for the queue. |
|
5.
|
From the 'Queue Greeting' drop-down list, select the greeting that will be play when the call enters the queue. |
|
6.
|
From the 'Music on Hold' drop-down list, select the music on hold that will be play when the caller waiting in the queue. |
|
7.
|
From the 'Routing Type' drop-down list, select the appropriate routing type: |
|
●
|
Round Robin (default): Sequentially hunt for each queue member |
|
●
|
Serial: Hunt each queue member starting from the first queue member |
|
●
|
Broadcast: Simultaneously ring for all the queue members |
|
8.
|
In the 'No Answer Timeout(Sec.)' field, enter the ringing time at the destination after which the call is considered as not answered by the destination. |
|
9.
|
From the 'Supervisors' drop-down list, select a Supervisor (see Step 9 in Adding a Worker). |
|
10.
|
From the 'Queue Members' drop-down list, select either a contact name or enter a E.164 number. If a contact is selected and a presence is activated for that contact, the relevant presence will be queried before trying to transfer to this destination. |
|
11.
|
In the 'Allow Routing on Teams Presence Status' check box, enable or disable for which Teams Presence Status the call should transfer. Available is always marked for transfer. |
|
12.
|
In the 'Overflow Call When All Queue Members Are ' check box, enable or disable the admin can choose on which Teams presence status will be considered as logged out. When all the queue members meet the selected presence status the caller will automatically transfer to the relevant action that configured in the 'When overflow condition is set'. |
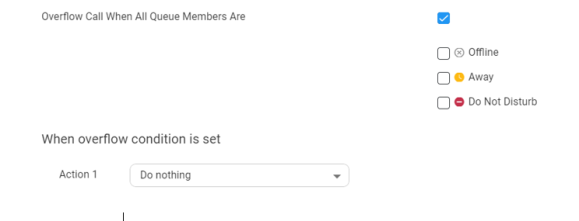
For more information of the possible Actions, see Actions.
|
13.
|
In the 'Maximum Call in Queue' field, enter the maximum number of calls that can wait in the queue (between 1 to 99). When the maximum number of calls has been reached, the caller will automatically transfer to the relevant action that configured in the 'When the maximum number of calls is reached'. |
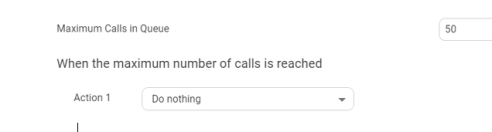
For more information of the possible Actions, see Actions.
This limit requires the same or higher licensed channels.
|
14.
|
In the 'Maximum Wait Time (Min.)' field, enter the maximum time for a call to be waiting in the queue. When the maximum wait time has been reached, the caller will automatically be transferred to the relevant action configured in the 'When the maximum wait time is reached' field. |
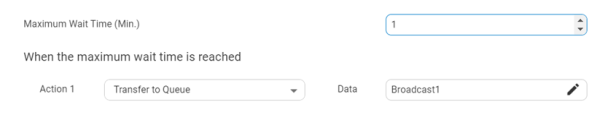
For more information of the possible Actions, see Actions.
|
15.
|
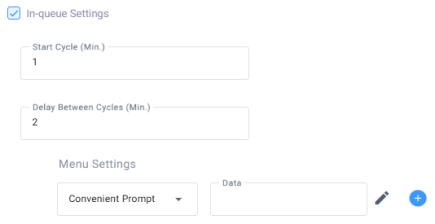
To provide callers with various actions and options during their waiting time, select the ‘In-queue Settings’ check box; the following appears: |
|
a.
|
In the ‘Start Cycle’ field, enter the duration (in minutes) that the basic ‘music on hold’ is played to the caller, before playing the set of in-queue actions to the caller. |
|
b.
|
In the ‘Delay Between Cycles’ field, enter the duration (in minutes) that the basic ‘music on hold’ is played to the caller after the current set of in-queue actions and before the next set of in-queue actions begins. |
|
c.
|
Under Menu Settings, select the actions and options that are played / offered when in-queue. Their order from top to bottom is the order in which they are played during the cycle. You can change the order by dragging and dropping each item. |
|
|
|
|
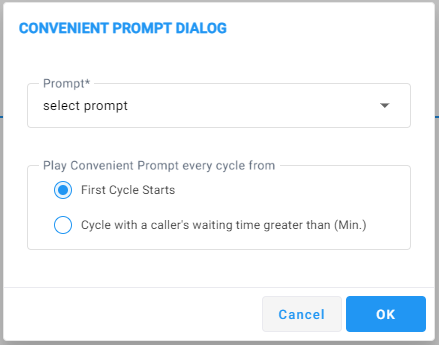
| Convenient Prompt
|
This prompt plays a selected prompt |
|
1.
|
Click the ‘Data’ field's  icon; the following appears: icon; the following appears: |
|
2.
|
From the ‘Prompt’ drop-down list, select a prompt from the Tenant’s prompts list. |
|
3.
|
Under the Play Convenient Prompt every cycle from group, select one of the following options: |
|
✔
|
First Cycle Starts - plays prompt according to duration configured in the ‘Start Cycle’ field (above). |
|
✔
|
Cycle with a caller's waiting time greater than - prompt starts playing in the cycle that is equal to or greater than the time configured in this field. |
|
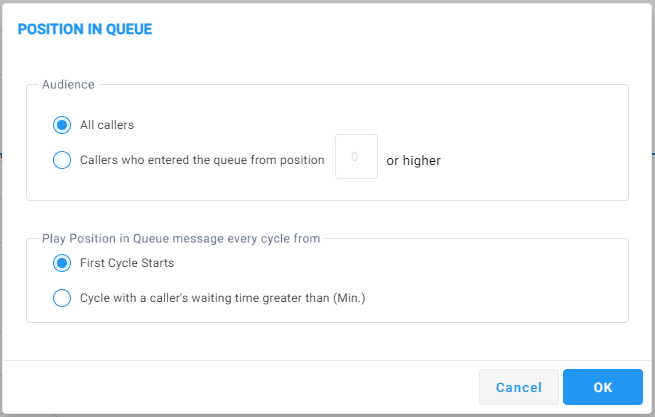
| Position in Queue
|
This prompt informs callers about their position in the queue. |
|
1.
|
Click the ‘Data’ field's icon; the following appears: |
|
2.
|
Under the Audience group, choose which callers will hear this prompt: |
|
✔
|
Callers who entered the queue from position - plays the prompt only to callers who entered the queue from the position that you configure in the field or higher |
|
3.
|
Under the Play Position in Queue message every cycle from group, select one of the following options: |
|
✔
|
Cycle with a caller's waiting time greater than - prompt starts playing in the cycle that is equal to or greater than the time configured in this field. |
|
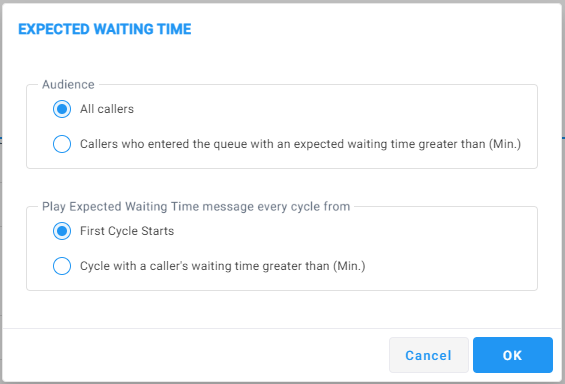
| Expected Waiting Time
|
This prompt inform callers about their estimated waiting time in the queue. |
|
1.
|
Click the ‘Data’ field's icon; the following appears: |
|
2.
|
Under the Audience group, choose which callers will hear this prompt: |
|
✔
|
Callers who entered the queue ... - plays the prompt only to callers who entered the queue from the position configured in the field or higher |
|
3.
|
Under the Play Expected Waiting Time every cycle from group, select one of the following options: |
|
✔
|
Cycle with a caller's waiting time greater than - prompt starts playing in the cycle that is equal to or greater than the time configured in this field |
|
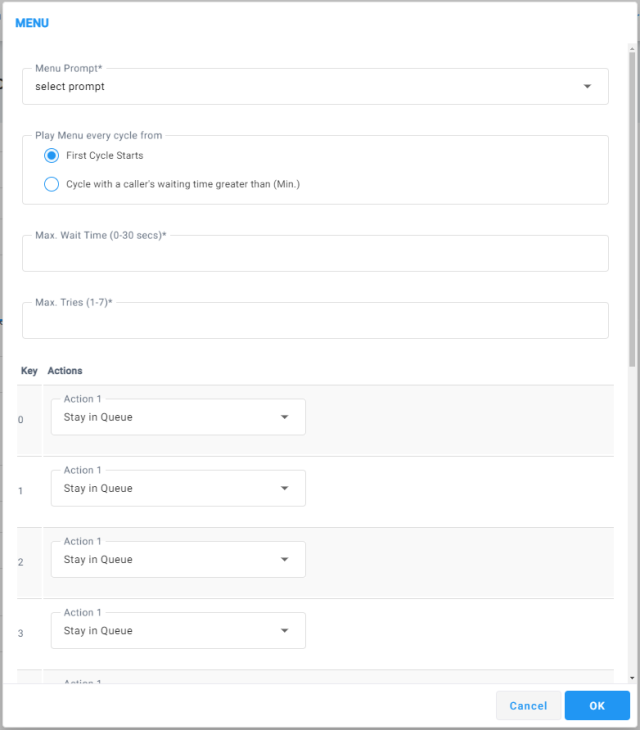
| Menu
|
Configure an in-queue DTMF menu to allow callers to make actions during their in-queue waiting time. |
|
1.
|
From the 'Menu Prompt' drop-down list, select a pre-configured prompt. For more information about these prompts, see Adding a Voice Prompt. |
|
2.
|
Under the Play Menu every cycle from group, select one of the following options: |
|
✔
|
Cycle with a caller's waiting time greater than - menu's prompt starts playing in the cycle that is equal to or greater than the time configured in this field. |
|
3.
|
In the 'Max Wait Time' field, enter how much time to wait in seconds (0-30) until the user presses the DTMF key. |
|
4.
|
In the 'Max Tries' field, enter how many times to repeat the prompts when there is no response from the user. |
|
5.
|
Under the Key Actions group, select one or more of the following options in the 'Action' drop-down list: |
|
✔
|
Callback - allows callers to request a callback, reserving their place in the queue. When it's their turn, Voca CIC automatically calls them back. |
|
6.
|
For more information on the above actions, see Actions. |
|